· Neon Jungle Astronomer · Tutorials · 9 min read
Synthetic Aperture Camera - Part 1 - Capture
Capturing the raw image tiles for a high resolution panorama

This article touches on some of the major steps that goes into capturing the raw images required for a Synthetic Aperture Camera (SAC) panorama.
Table of contents
Site Selection
For this panorama, I’m after a view of Adelaide city. To help find potential good sites to set up my system, it helps to start by visualising the direct Line of Sight (LoS) from the city to different elevated positions surrounding the city. This can be done using the Viewshed function in Google Earth.
- Put down a placemark on the target area, in this case somewhere in the city. Set the elevation somewhere above ground as there’s no need to capture images of the ground. I’ve used 25 m to get above the tree line.
- Ensure ‘3D Buildings’ and ‘Terrain’ layers are checked
- Select Edit -> Viewshed and wait for the viewshed to display
If the viewshed does not extend out far enough (default is ~10 km) from the target placemark, increase the value at
#define kMaxWorldSpaceLength 0.0015678559in viewshed.h (/opt/google/earth/pro/shaders/viewshed.h on my machine) and restart Google Earth.
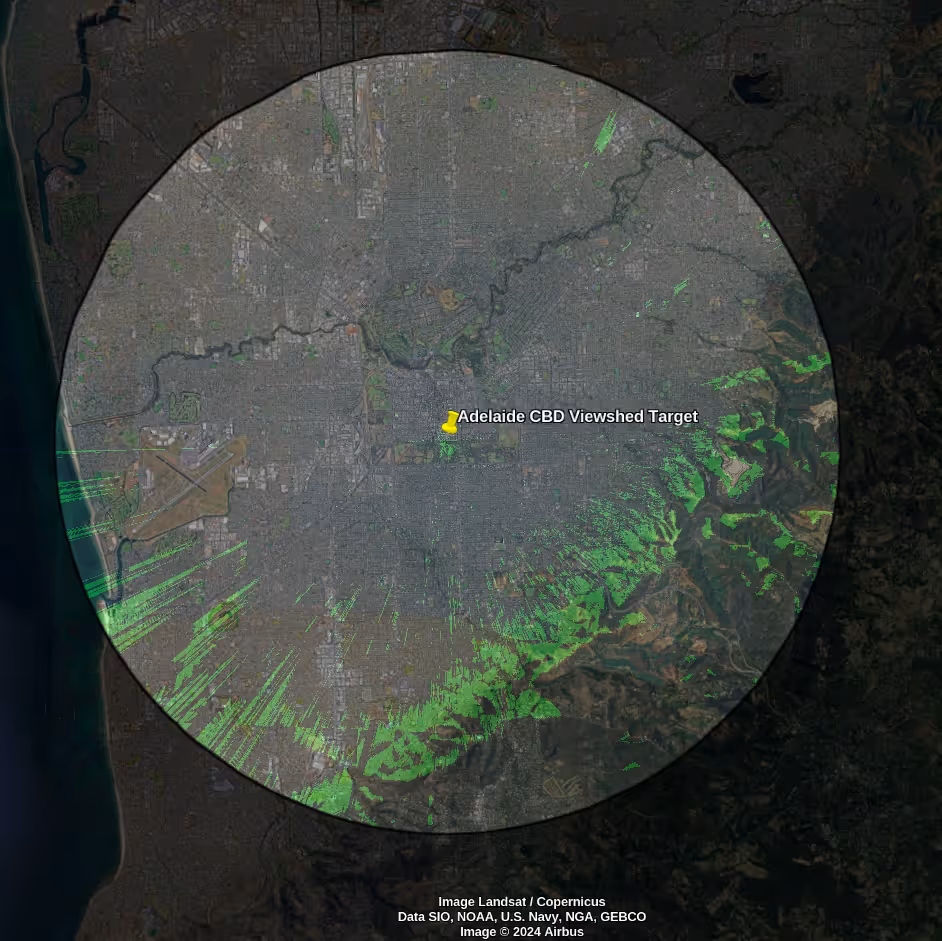
Viewshed showing LOS of Adelaide CBD
As expected, the foothills south and east of Adelaide have some unobstructed views to the city. Next, I used a combination of Google Maps street view, followed by driving through some of the promising areas, to create a short list of potential locations. I scouted five areas south of the city through the foothills potentially suitable for a setup. I needed to narrow these choices down to one by comparing the characteristics of each site.
Important factors to consider:
- Accessibility: Can the setup run from a car, or do I have to transport equipment on foot? Is it accessible at night?
- Flat: Things become much harder to physically set up and execute if running on a slope.
- Light pollution: Especially important at night, but even true during the day, I don’t want to set up under street lights nor in areas where car headlights frequently come by.
- Privacy: I’d prefer to avoid members of the public coming up who may be curious and accidentally wandering in front of a shot.
Based off these factors, I selected a site in Pasadena, south of the city.
Hardware
At its core, I needed a controllable telescope and a camera. Some additional accessories were required to complete the capability.
Telescope
There are lots of telescopes out on the market. I knew I needed a portable one to take to different sites, so I had to keep the form factor small. At the same time, aperture is king. The telescope also needed to be able to fit a camera and have a computerised mount that was able to be controlled by software.
I decided the most suitable telescope was a SkyWatcher Virtuoso 150P. This is a collapsible Dobsonian GOTO tabletop telescope with 150 mm aperture and 750 mm focal length (making it a fast telescope). It can be powered by batteries or mains, and communicated to via WiFi. It could be considered a bit of a ‘jack of all trades’ type of unit. I wanted to use it for visual use, as well as Electronically Assisted Astronomy (EAA), or even basic astrophotography. I also wanted to use it for terrestrial use and not just space. It does all of these adequately without excelling in any particular area, but more importantly, without being terrible in any of these areas either. The collapsible aspect of it also helps to achieve back focus with cameras.
Camera
The two main types of cameras available are traditional DSLRs and astrophotography cameras. DSLRs are heavy, and more importantly, I didn’t already have one as the best camera you have is the one you take with you (a phone). I only ever considered astrophotography cameras.
The two big manufactures in the astrophotography camera space are ZWO and Player One. Between them, they have dozens of cameras to choose from for different niches, again making it a hard choice to select. I knew I didn’t want a ‘cooled’ camera as these are expensive, heavier, require additional power, and are more suited to Deep Sky Object (DSO) astrophotography. I also knew I wanted a One Shot Colour (OSC) camera, because having to use a filter wheel takes triple the time to capture an image with. I ended up selecting the ZWO ASI585MC for its large 1/1.2” sensor format at 3840x2160 resolution. It also has a 12-bit ADC and needs no dark frames for calibration (both more useful for astro but still applicable in this terrestrial space).
Accessories
A brief list of supporting equipment used:
- Bahtinov mask - Used to help manual focusing. Can be used to target building aircraft warning lights for terrestrial purposes. They can be 3D printed or ordered sized for the telescope aperture.
- Shroud - Custom built, helpful to stop local light pollution leaking in to the camera sensor.
- IR/UV cut filter - I only care about capturing ‘real’ colours visible to the eye - filter out infrared and ultra-violent light wavelengths which the camera will be flooded with.
- LiFePo4 battery and power inverter - Provides power output 230 V AC.
- Laptop to run software, and the screen also provides a good planar light source for flat calibration frames
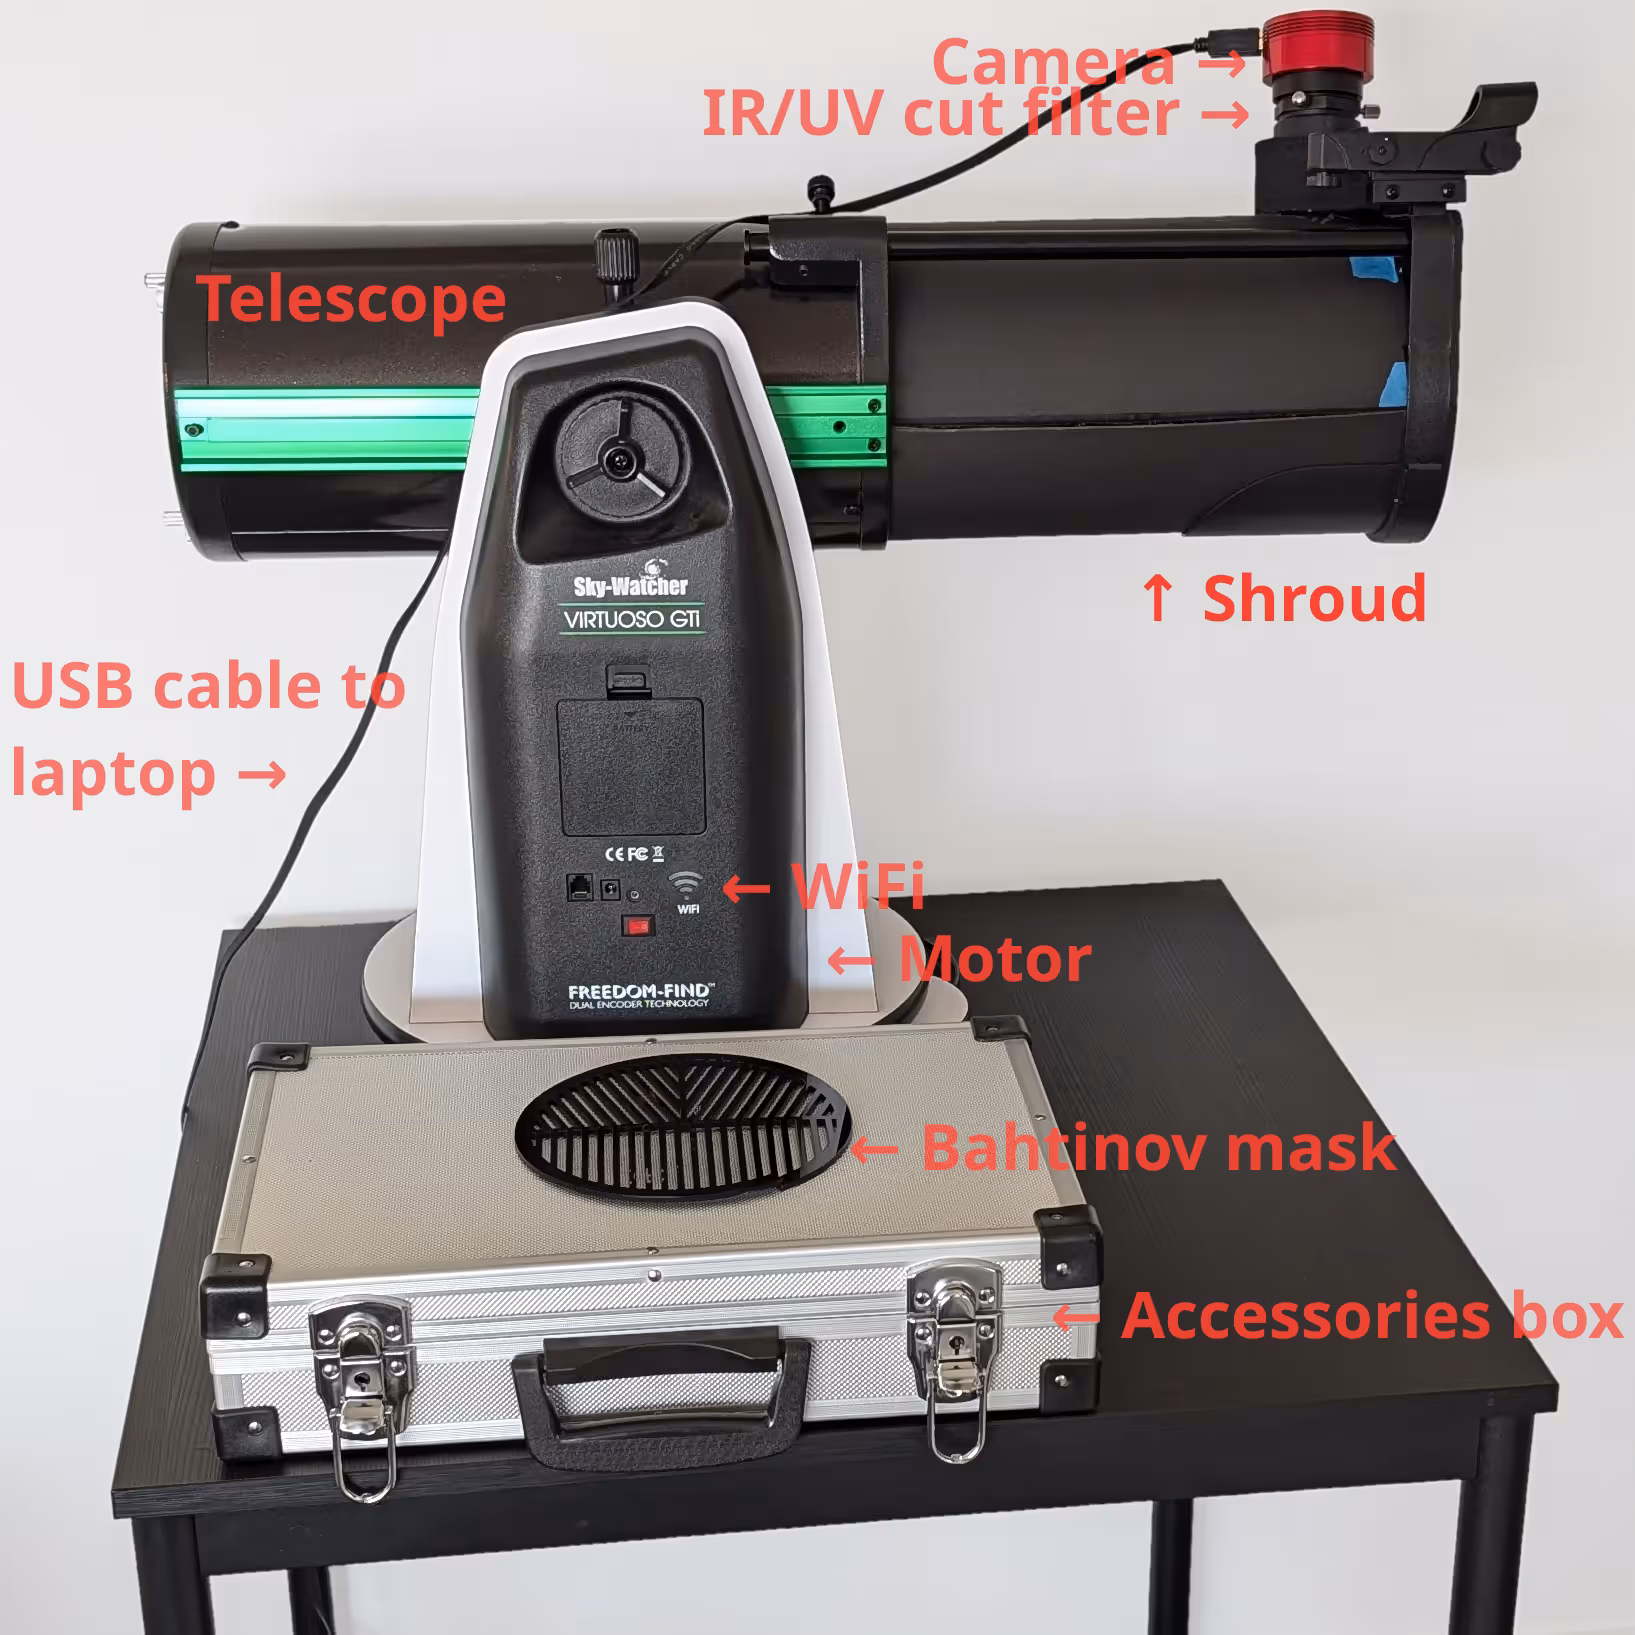
Complete hardware set up
This compact setup is relatively easy to pick up and transport to suitable locations, with quick set up and pack down times.
Software
Controlling the hardware for the purpose of Synthetic Aperture Camera panoramas is all done through a combination of self-written software and vendor applications.
Vendor
ASICap from the camera manufacturer ZWO was used to display image previews after changing any settings prior to saving them for capture execution. Of importance:
- Using the Bahtinov mask to find a good focal point. Achieved primarily by adjusting the hexagonal focus tube, but at times the truss on the collapsible telescope.
- For figuring out what exposures would work for the city and its surroundings.
- To take the bias and flat calibration frames. Dark calibration frames are not necessary with this particular camera.
Custom software
Where all the good stuff happens. Fundamentally, the self-written custom software instructs the telescope to follow a serpentine pattern across the azimuth and elevation of the area of interest, stopping between each step to take multiple images at different exposures. There’s a few configurable values of critical importance to get right for a given scenario, as otherwise during post-processing the images can be unusable and the entire capture wasted.
- Azimuth & elevation range: Define a range of the city scape to take images over. Google Earth’s ruler combined with an image preview can help give the bounds. Will require an offset if telescope hasn’t been aligned or otherwise synchronised.
- Azimuth & elevation overlap: When calculating the required azimuth & elevation steps, provide a bit of redundancy moving from one step to the next. Higher overlap provides more points to connect neighbouring images in the mosaic, but the trade-off is more images need to be taken, which increases the execution duration, and also post-processing duration.
- Iterations: How many times to repeat the telescope scanning. Useful to mitigate transient interferers.
- Settling time: How long to wait after a slew to let the telescope’s motor movement vibrations settle.
- Exposures: Bracketed values of different exposures to take to increase image dynamic range. Lower (faster) exposures mean less ghosting and blur in images, but darker images. Optimal values are tightly coupled with gain.
- Gain: Amplification for camera sensor readout. Trades off lowering exposure times for increasing noise.
- Image format: RGB24/RAW8/RAW16. Output image type from the camera. RAW theoretically enables higher image quality than directly getting RGB off the camera but takes more effort to process.
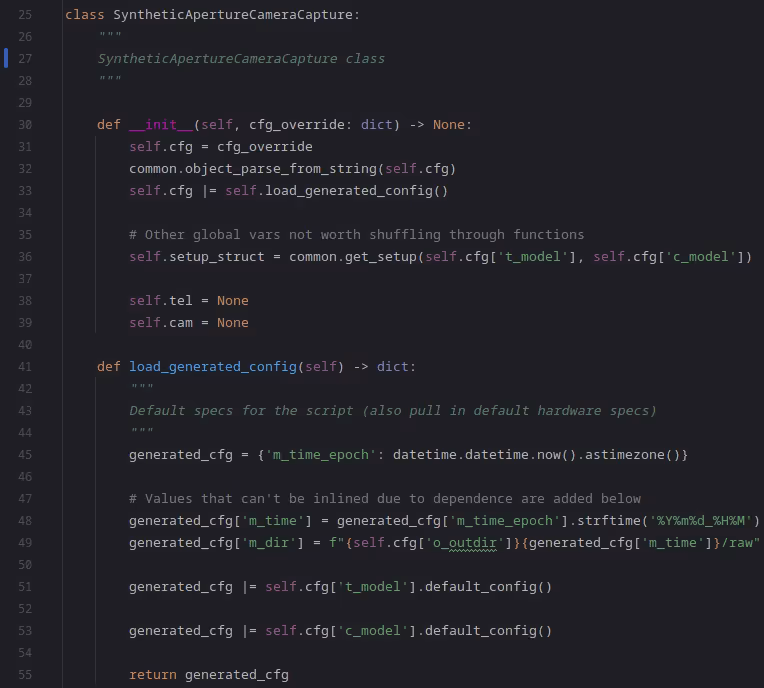
Code excerpt from software
The software allows autonomous execution of hardware control, enabling repeatable capture executions.
Execution
A significant factor in the success of the capture comes down to choosing the right day and time for capturing images. A weather forecast is good to help avoid any precipitation and windy conditions. As a telescope is trying to see through significant atmosphere, the haze from traffic exhaust and other pollutants noticeably detract from the image quality. Unfortunately there’s no easy way to predict the air quality (even considering factors like holidays don’t really work) and so checking the quality in-situ is really the only way.
With a good night selected, I set up the telescope, camera, and other hardware on a flat and stable location. I left the telescope here for half an hour to let the telescope mirrors acclimatise to the environment. I checked the collimation (alignment between the two mirrors in the telescope) which can get disturbed with vibrations from vehicle transport.
I connected my laptop and telescope to the battery and inverter, and then the camera to the laptop via USB cable. Next I spent a bit of time trying to achieve the best focus starting with the Bahtinov mask, and finalising using the sharpness of the text on the side of tall buildings. Although the focus should be the same across the city at the distance of ~9 km, it pays to check the focus still holds on the edges of the target area.
I then revisit all the script configuration options, taking special care that the azimuth & elevation limits would work, as would the gain and exposure values. I then run a test on a small area of the city, just to ensure software is working as expected, and nothing has been missed in setting up the hardware, such as tugging of the USB cable on the telescope from the camera to laptop. With the gain value decided, calibration frames can be taken. A good external guide is available here.
With everything set, I hit ‘Go!’, look at the predicted completion time, grab a thermos, and wait. In this particular capture, the Adelaide cityscape takes just under an hour to complete due to some conservative overlap and settling time options set. Occasionally I’ll look at the image files being captured, checking for any issues.
Once it’s done, I make a backup of the raw files, and set read-only, sticky-bit, and immutable flags on all the files to protect them from being accidentally deleted.
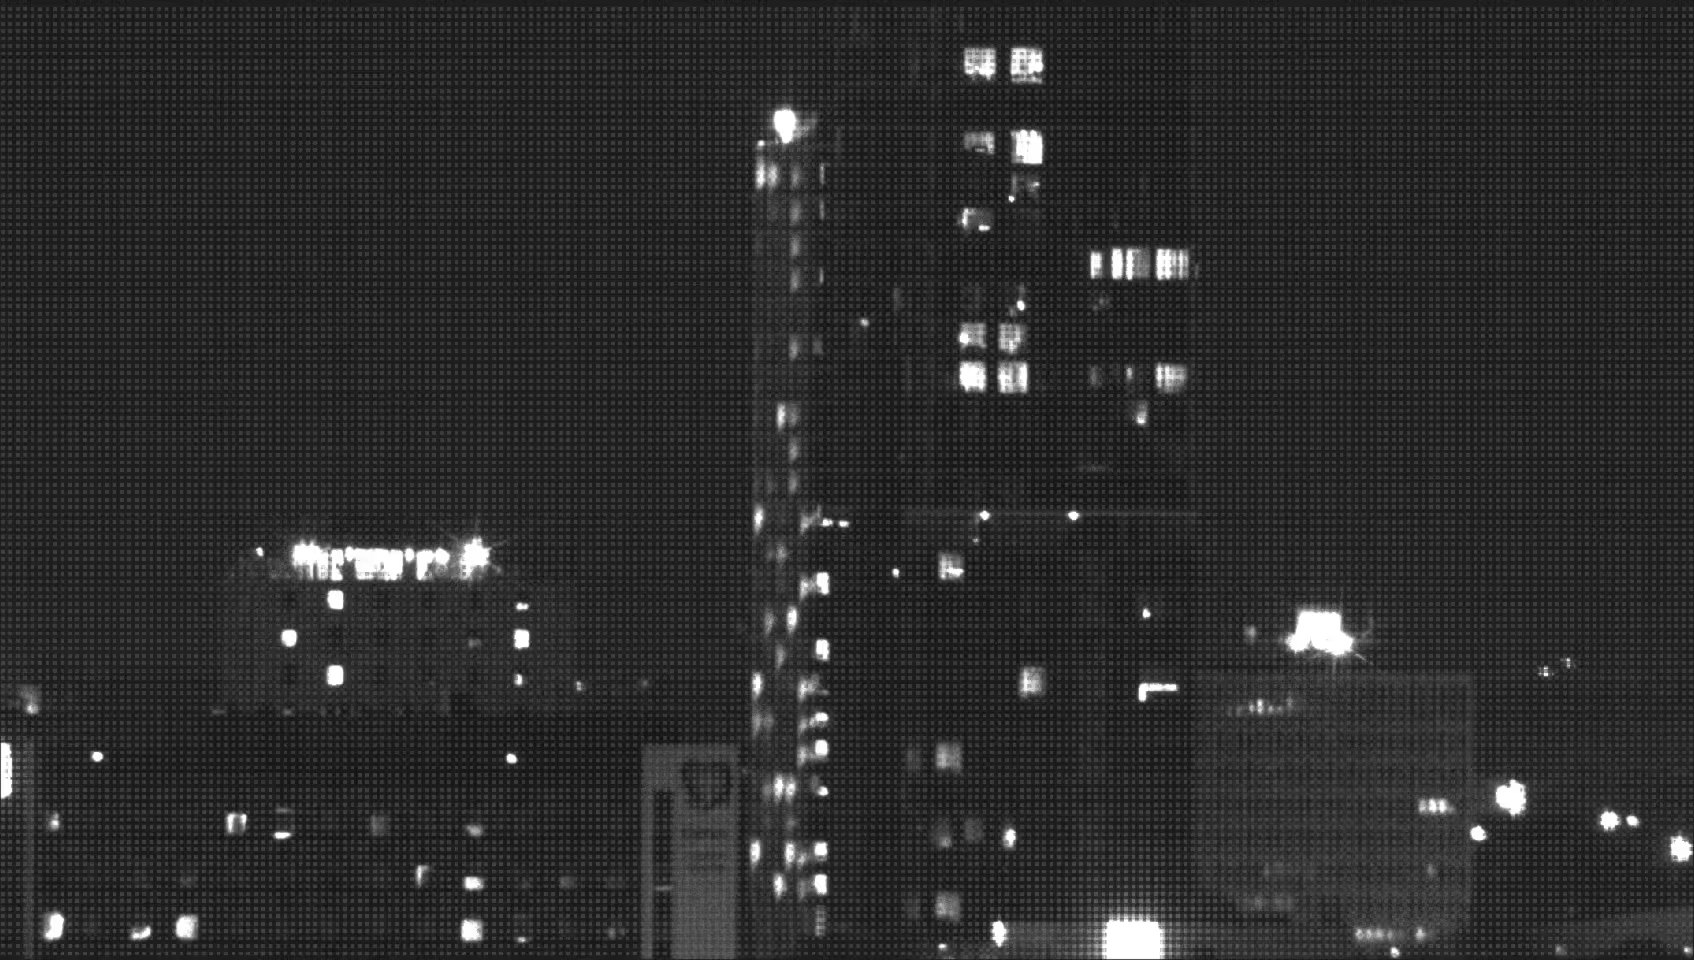
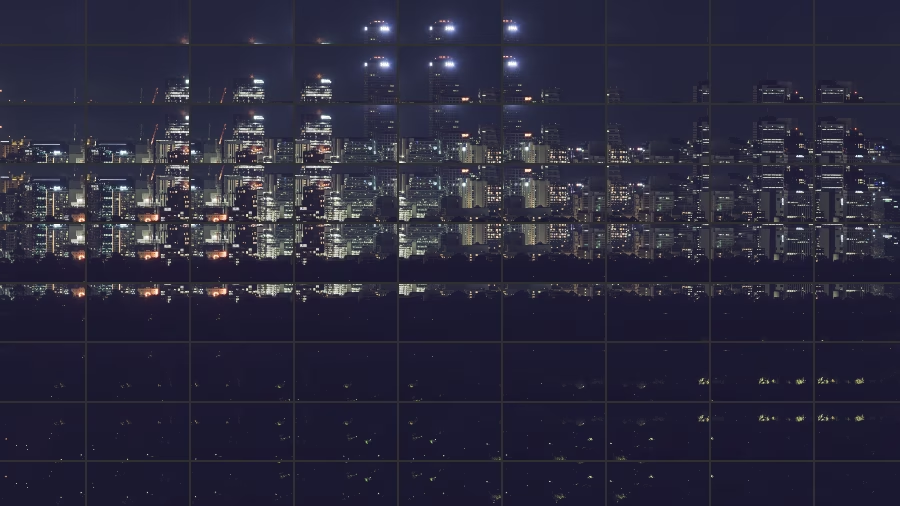
Example of a RAW image tile of the Calvary Hospital logo distorted by the Bayer matrix
With this done, I’m left with 1,980 RAW images totalling 30.6 GB to work with. For how I go about processing these images into a detailed cityscape panorama, check out the article on SAC processing.